A Guide to Git
For quite some time, git had been this nebulous, terrifying, thing for me. It was kind of like walking on a tight rope holding a bunch of fine china.
But you can’t run away. Git is becoming an inescapable skill for anyone in a technical, collaborative field. Fields like data science. So I finally bit the proverbial bullet and ventured into understanding what git commands were actually doing with my code.
Fortunately, learning git wasn’t as complicated as I had thought. By correcting my underlying mental model of it, I had more confidence and less anxiety when tackling new projects.
The four areas of git
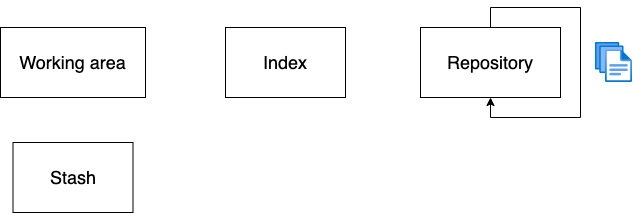
There are four areas in git: stash, working area, index, and repository.
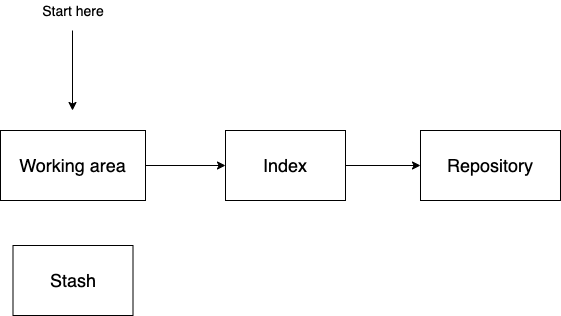
Your typical git workflow works from left to right, starting at the working area. When you make any changes to files in a git repository, these changes show in the working area.
To view changes you made to files along with new files you created, do a git status. To show the more granular details about the exact file changes, do a git diff [file name].
Once you’re satisfied with your changes, you then add the changed files from the working area to the index with a git add command.
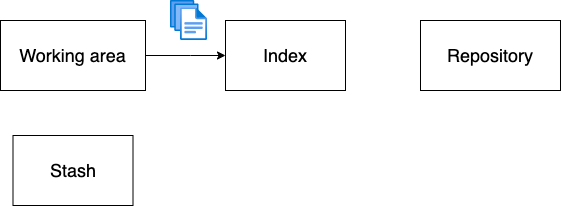
The index is like a staging area for your files. It’s there for you to experiment with changes, but you don’t have to keep those changes. Instead, you can individually add the changes from the working area you want to keep, whether big or small.
In fact, it’s best practice for the changes you add to be some logical unit or collection of related things. For example, you might decide to add all the files with changes that relate to the new preprocessing function you wrote in Python.
Once you’ve added all relevant files to the index, finally move them to the repository by doing a git commit -m 'Explanation of my changes'. You should see that there’s no difference between the index and repository now by verifying with a git diff --cached.

Mistakes were made
But life is not so ideal. Eventually you’ll make a commit with an inappropriate message that you want to change. Or you’ll decide that all those new things you added broke your code and now you want to go back to how it was before. Or you want to pull your coworker’s updates, but there are file conflicts.
You might have seen git commands like rebase, reset, and revert. If these commands scare you, you’re not alone. Some of them are powerful and can destroy your project if you don’t know how to use them. But fret not, you’re about to learn how to use them. 😊
Moving backwards
Up to this point, the commands you’re familiar with, like git add and git commit, have moved your code throughout the areas from left to right. Now you’ll discover how to move backwards in the git areas to undo changes you’ve made to files or revert back entirely to a previous commit.
Say you’re working on a file and realize that all your new changes won’t pan out. Instead of manually figuring out how to undo all your changes, you realize you can go back to the version of the file you had in your last commit. So you execute git reset --hard HEAD [file name].
Let’s unpack that command. HEAD refers to the previous commit you had. It’s useful because otherwise you would have to find the commit hash instead. But if that’s something you want to do, then do a git log.
Think of reset as the controlled claw in one of those crane claw machines.

Image from eBay
reset allows you to pick the files you want out of a particular commit in the repository. You then get the option of which git areas you want to place those files into by using one of the following flag commands: --hard, --mixed, and --soft.
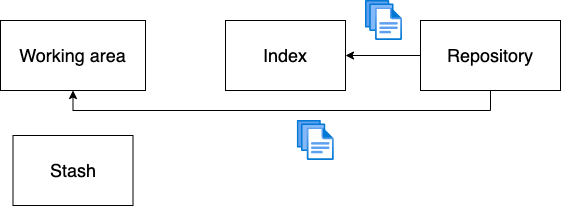
As you saw above, git reset --hard HEAD [file name] will take the file name from the previous commit and apply it to both the index and the working area.
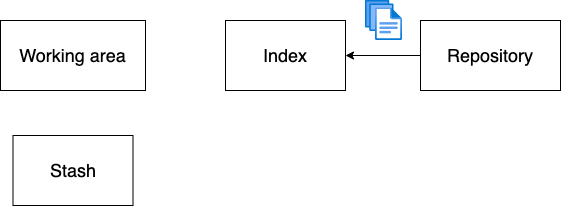
But git reset --mixed HEAD [file name] will take the file name from the previous commit and apply it to just the index.
Lastly, git reset --soft HEAD [file name] will take the file name from the previous commit and apply it to just the repository.
Reverting to a previous commit
Let’s say you pushed something to your repository but it’s not working out. You can go back to a previous commit where your code was working by doing a git revert [commit hash]. Remember, you can find your commit hash by doing a git log.
It’s as easy as that, but there’s one thing to note. Revert doesn’t wipe any of your history up to the commit you choose. Rather, it creates a new commit using the exact state of the previous commit you choose to revert back to. It’s nice, because it doesn’t mess up any of your git history.
Editing your commit history
It doesn’t take long in your journey in git to come across some things you wish you could undo.
For example, you commited a file to the local repository, but you messed up the commit message. Or say you made some small commits that you’d rather group together into one commit. This is where git rebase shines.
Say you have a group of small commits.
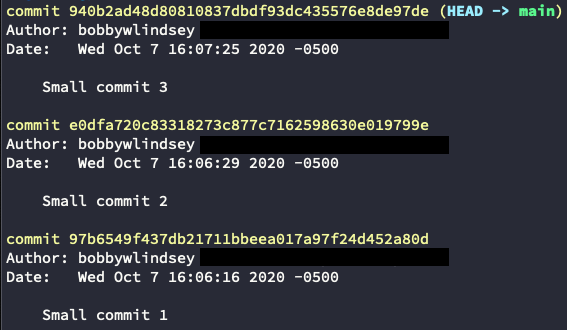
You want to merge them together and then give the merged commit a new message. To do this, type git rebase --interactive origin/main.
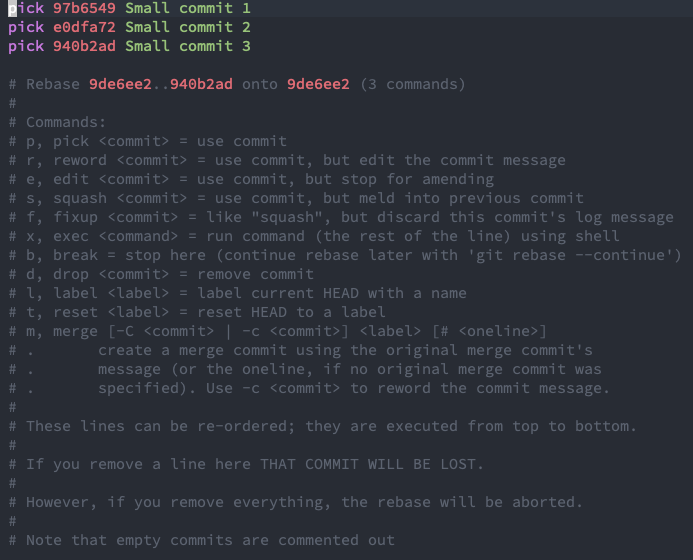
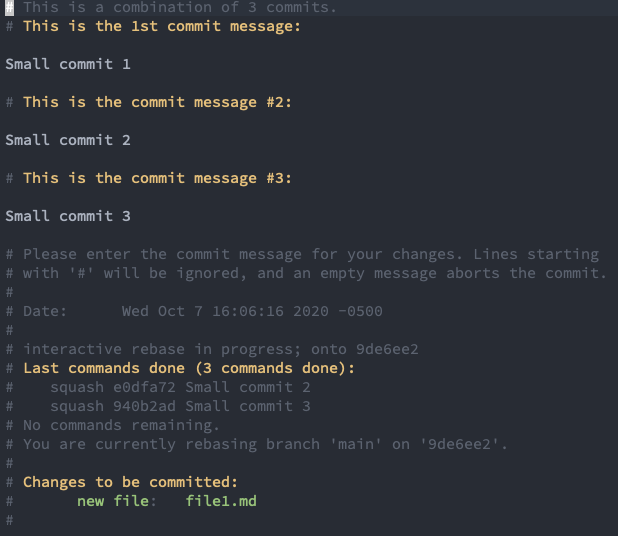
Then go ahead and make the changes you want. In this case, you want to squash the last two commits into the first one you made.
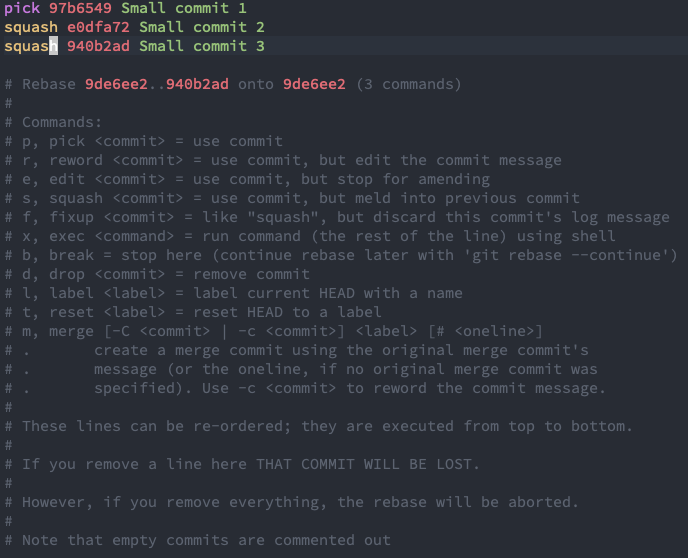
After you do this, go ahead and save the file and close. This will bring you to a new window to edit the final commit message.
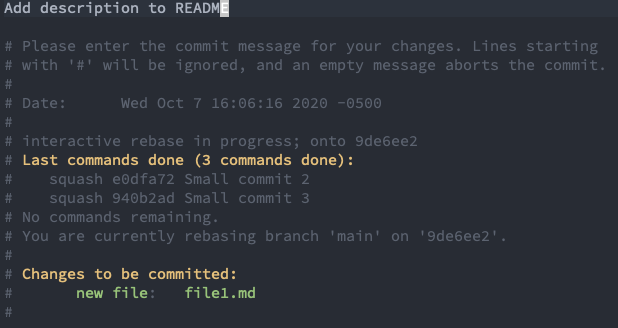
You make a change to the final commit message.
And now you can see that you’ve merged or squashed the previous three commits into one.

Renaming a remote branch
Say there’s a branch you want to rename and you’ve already pushed it to your remote repository in GitHub or wherever. Assuming you’re the only one working on this branch, you can change your branch name by doing the following:
git checkout [your branch]git branch -m [new branch name]git push origin :[your branch] [new branch name]git push origin -u [new branch name]
The typical git workflow
Let’s say you and your team are contributors to a repository in GitHub. You’ve got a main branch as your default, primary branch.
But you want to know how to collaborate with each other so that you’re not overwriting each others’ work. The following is one such workflow I’ve used a lot in the past:
- First make sure the
mainbranch is up-to-date withgit checkout main; git pull. - Create a new branch off of the
mainbranch withgit checkout -b [your branch name]. - Add that new feature or fix that bug and do a
git pushto push it to your branch. - When you’re ready to merge your changes into the
mainbranch, create a pull request in GitHub. This allows your teammates to look at your code and offer any suggestions for improvement. If it looks good, GitHub will let you merge your changes intomain. - Now clean up your local repository by: 1) Updating your local
mainbranch with the changes that were just merged in the remotemainbranch withgit checkout main; git merge your-branchand 2) Deleting the local branch you were working from,git branch -d [your branch name].
Now repeat that workflow for any changes you want to make. 👍
Closing remarks
If you want to learn more about git or prefer an interactive environment, check out Learn Git Branching.
If you want to know how to handle some other tricky git scenarios, checkout Dangit, Git!?!.
You’ve learned a lot so far. You’ve learned about the four areas of git and the commands that move your changes through some of these areas. You’ve also learned how to revert to a previous commit, edit your commit history, and rename branches. You’ve seen what a typical git workflow looks like.
I hope this post was helpful and that you’ve come away with a better understand of what many of these git commands are doing. If you have any questions or cool git tricks, feel free to leave a comment!